(THE ART OF SCALING YOUR BUSINESS WITH ZERO AD COSTS)
LETTER FROM THE AUTHOR
In the pages that follow, I present to you a comprehensive guide on mastering the technical intricacies of cold emailing. As the author of this ebook, Gulshan Iyer, I am happy to share insights and knowledge accumulated through practical experience in successfully implementing cold email systems for my business.
If you’d like us to implement the complete system for your business, book a meeting here
The technical expertise and strategies outlined herein reflect the learnings and best practices derived from the real-world application of cold emailing principles. This guide is not merely a compilation of theoretical concepts; rather, it is a reflection of the challenges, successes, and continuous refinement of our own cold email systems at Gulshaniyer.com.
Gulshaniyer.com offers a ‘Done For You’ service, streamlining businesses with an efficient cold email system. This ebook serves as an in-depth breakdown of the technical nuances that power our service. While the content provides you with the knowledge to construct your system, we strongly recommend considering our services to minimize potential pitfalls and ensure a seamless implementation process.
It is crucial to recognize that the information shared in this guide is not exclusive to us. Cold email strategies and technical know-hows are available across various online platforms. However, what you hold is a consolidated, refined, and better-elaborated guideline based on our personal experiences.
Feel free to leverage the insights shared here to create your cold email system. We encourage learning and growth in all aspects of business. Whether you choose to implement the system yourself or opt for our services, this ebook aims to empower you with the right inputs to make informed decisions and elevate your cold emailing strategy.
Best Regards,
Gulshan Iyer
Table of Contents
1. Introduction
1.1 The Power of Cold Emailing
1.2 What You Will Learn
2. Getting Started with Cold Emailing
2.1 Understanding Cold Emailing
2.2 Benefits of Cold Emailing for Sales
3. Setting Up Your Domain for Email Outreach
3.1 Choosing the Right Domain
3.2 Domain Setup Essentials
4. Email Setup for Maximum Efficiency
4.1 Setting Up Your Email Account
4.2 Best Practices for Email Configuration
5. Ensuring Email Deliverability
5.1 Understanding SPF (Sender Policy Framework)
5.2 Implementing DKIM (DomainKeys Identified Mail)
5.3 Setting Up DMARC (Domain-based Message Authentication, Reporting, and Conformance)
6. Advanced Techniques in Cold Emailing
6.1 Custom Tracking Domain Setup
6.2 Analyzing and Improving Email Performance
7. Crafting Effective Cold Email
7.1 Writing Compelling Email Content
7.2 Subject Line Strategies
7.3 Call-to-Actions That Convert
8. Legal and Ethical Considerations
8.1 Complying with Email Regulations
8.2 Ethical Practices in Cold Emailing
9. Conclusion and Next Steps
9.1 Summarizing Key Takeaways
9.2 Implementing What You’ve Learned
10. Appendix
10.1 Additional Resources
10.2 FAQs
Technical Setup 🛠
Tech setup – the most boring but absolutely critical part of doing cold email outreach.
You can do every aspect of cold emailing perfectly, but if you do not have your domains and emails set up perfectly you will face major deliverability issues that can ruin your whole outreach.
On top of covering how to set up your domains and email accounts for sending, we will also tell you why these things matter, so you can understand their importance.
We will go through:
1. Buying domains and creating email accounts.
2. Setting up SPF, DKIM & DMARC.
3. Setting up your own Custom Tracking Domain.
4. Setting up forwarding to your main domain.
The good thing about technical setup is that it’s the easiest part of the cold email process to outsource because it is the exact same process every time. Once you understand it yourself, you can delegate it to VA’s who can just follow guides and set this up for you while you work on other tasks like copywriting, lead sourcing and campaign optimization.
Let’s get into it.
CHAPTER I
Buying domains and creating email accounts.
Procuring domains and setting up email accounts is a critical step in cold email outreach. We strongly advise opting for well-established domain and email service providers to avoid complications. Google and GoDaddy consistently provide reliable services, minimizing issues for cold emailers.
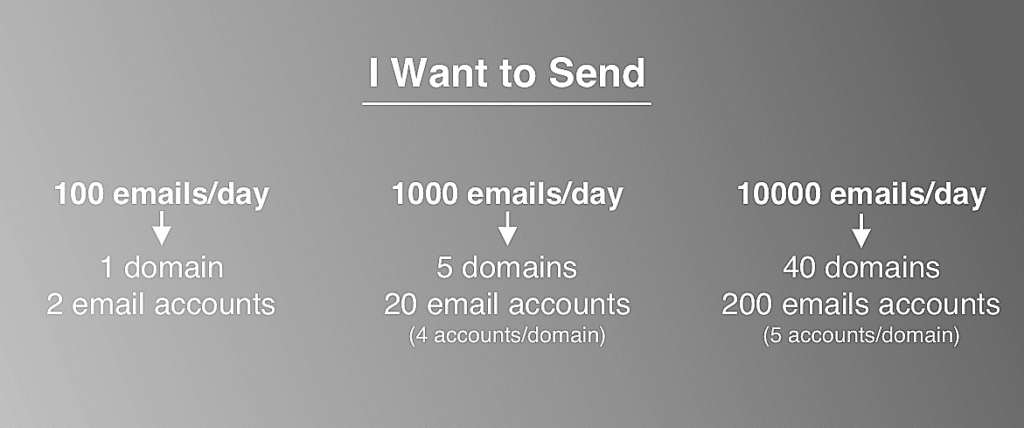
Determining the number of domains and email accounts depends on your outreach goals. Consider the volume of cold emails you plan to send daily based on your lead list size and available resources for handling responses and interactions.
Here’s a simple guide:
1. Aim for approximately 50 emails per day per email account.
2. For instance, if you plan to send 1000 emails daily, you’d need 20 email accounts (1000/50).
3. It’s recommended to have 3-5 email accounts per domain, so for 20 email accounts, you’d need around 4-7 domains.
Use this formula:
– Total required emails per day / 50 = Number of needed email accounts
– Number of needed email accounts / 5 = Number of needed domains
Remember, these numbers are flexible. We suggest a range of 3-5 email accounts per domain, erring on the lower side for safety. Additionally, it’s wise to purchase extra domains and create additional accounts for contingency. This way, you can easily adjust your sending volume or replace domains/accounts in case of unforeseen issues.
In summary, secure your domains from reputable providers like Google or GoDaddy, calculate your email account needs based on your outreach goals, and maintain a safety margin with extra domains and accounts.
CHAPTER II
SPF, DKIM & DMARC
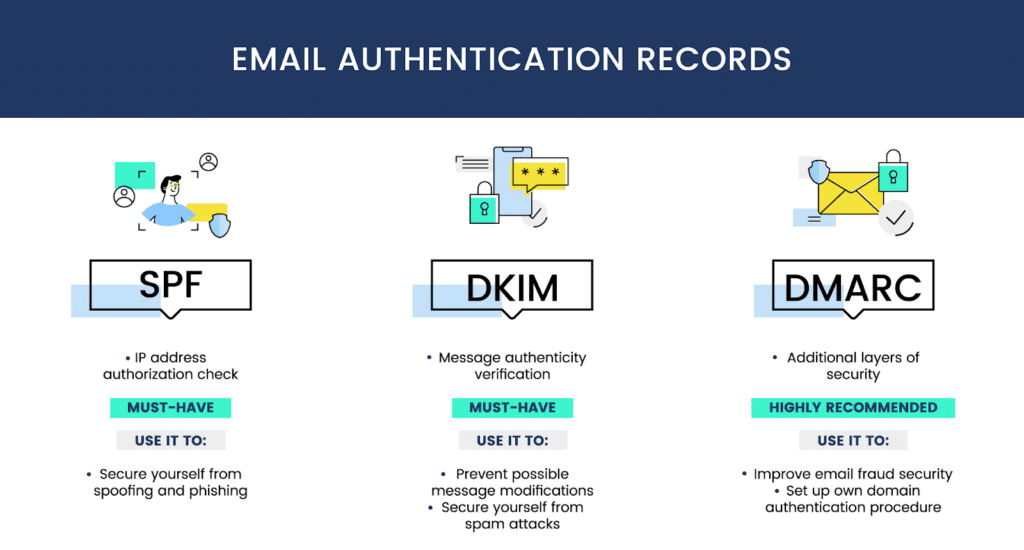
If you’ve dipped your toes into the realm of cold emailing, you’ve likely encountered terms like SPF, DKIM, and DMARC. While familiar, the true understanding of these terms often eludes many. They all find their place in your domain’s DNS settings, accessible through your domain provider’s settings.
Among the popular domain providers—GoDaddy, Namecheap, and Google Domains—let’s demystify the significance of SPF, DKIM, and DMARC.
What is SPF?
Sender Policy Framework (SPF) is a crucial entry in your domain provider’s DNS records. Its role is to specify which servers are authorized to send emails on behalf of your domain. For instance, if you use Google Workspace for emails, setting up Google’s SPF records signals that Google’s servers are legitimate senders for your domain. This assurance prompts other email servers to place your emails from Google’s servers into the recipient’s main inbox.
What is DKIM?
Domain Keys Identified Mail (DKIM) is another entry in your domain provider’s DNS records. It adds a signature to all your emails, ensuring that an email was sent and authorized by your domain. Email servers at the recipient’s end verify this DKIM signature, enhancing the likelihood of your email being placed in the inbox as a low-risk communication.
What is DMARC?
Domain-based Message Authentication, Reporting & Conformance (DMARC) completes the quartet. A DMARC record allows a sender to declare that their messages are shielded by SPF and DKIM. This declaration eliminates the guesswork for the recipient’s email servers, increasing the likelihood of your emails landing in the inbox.
In essence, having all four—MX, SPF, DKIM, and DMARC—records set up is paramount for your email account’s smooth functioning. Neglecting these records may lead email providers like Google to scrutinize your account. Understanding and implementing these records not only ensures functionality but also builds trust in your email communications.
CHAPTER III
How to Setup?
Setting up SPF, DKIM, and DMARC is vital for robust email security and deliverability. Follow these guides, complete with videos, for the most widely used domain and email service providers:
GoDaddy:
1. RECOMMENDED: [Setting up SPF, DMARC, and DKIM for GoDaddy & Google Workspace](link)
2. [Setting up SPF, DKIM, and DMARC for GoDaddy & Microsoft/Office 365](link)
NameCheap:
1. [Setting up SPF, DKIM, and DMARC for NameCheap & Google Workspace](link)
2. [Setting up SPF, DKIM, and DMARC for NameCheap and Microsoft/Office 365](link)
Custom Tracking Domain:
Now, safeguard your email deliverability by establishing your custom tracking domain. This personal domain (or sub-domain) tracks opens and clicks in your emails, ensuring the health of your domains and deliverability. Here’s a simple guide:
1. Go to your domain settings at your domain provider.
2. Add a new CNAME type record.
3. Set the value as `prox.itrackly.com`.
4. Set the name as `inst`.
5. Insert your custom tracking domain in Instantly, formatted as `inst.yourdomain.com`.
Guides for popular domain providers:
1. [Setting up custom tracking domain with GoDaddy](link)
2. [Setting up custom tracking domain with NameCheap](link)
For multiple sending accounts with the same domain, update Custom Tracking Domain settings by entering the same tracking domain. For example, use `inst.domain1.com` for all sending accounts with `domain1.com`. For different domains, repeat the process to set up custom tracking domains separately.
This straightforward setup ensures your email security, maintains deliverability, and enhances the overall health of your communication channels.
Completing the technical setup, ensure that all your sending domains are forwarded to your main domain. This is a straightforward process and marks the final step in the setup. Here’s why forwarding is essential and how to do it using GoDaddy and NameCheap:
CHAPTER IV
EMAIL FORWARDING
Legitimacy Check: When individuals manually verify the origin of your email, forwarding directs them to your main business domain. This reassures them about your legitimacy and provides an opportunity to learn more about your business.
Permanent Linking: By employing permanent (301) forwarding, your secondary domains are permanently linked to your main domain. This strengthens the association between them.
How to Set Up Forwarding:
GoDaddy:
1. Log in to your GoDaddy account.
2. Navigate to your domain manager.
3. Locate the domain you want to forward and click on it.
4. Look for the “Forwarding” section.
5. Click “Add Forwarding” and enter your main domain as the forwarding destination.
6. Choose “301 Permanent” as the type of forwarding.
7. Save your changes.
NameCheap:
1. Log in to your NameCheap account.
2. Access the dashboard and select “Domain List.”
3. Choose the domain you want to forward.
4. Navigate to the “URL Redirect” section.
5. Add your main domain as the destination URL.
6. Opt for “301 Permanent Redirect” as the type.
7. Save the changes.
With these steps, you’ve completed the domain forwarding process, reinforcing your email legitimacy and creating lasting links between your domains. Your technical setup is now comprehensive and ready for seamless cold email outreach.
To confirm the correctness of your technical setup, follow these steps after connecting your sending accounts to Instantly:
1. Test SPF, DKIM, and DMARC Setup:
– Click on the “Test Domain Setup” button in Instantly.
– If everything is configured correctly, a confirmation message will appear.
2. Check Custom Tracking Domain Status:
– Verify that your custom tracking domain is functioning by navigating to each sending account’s settings.
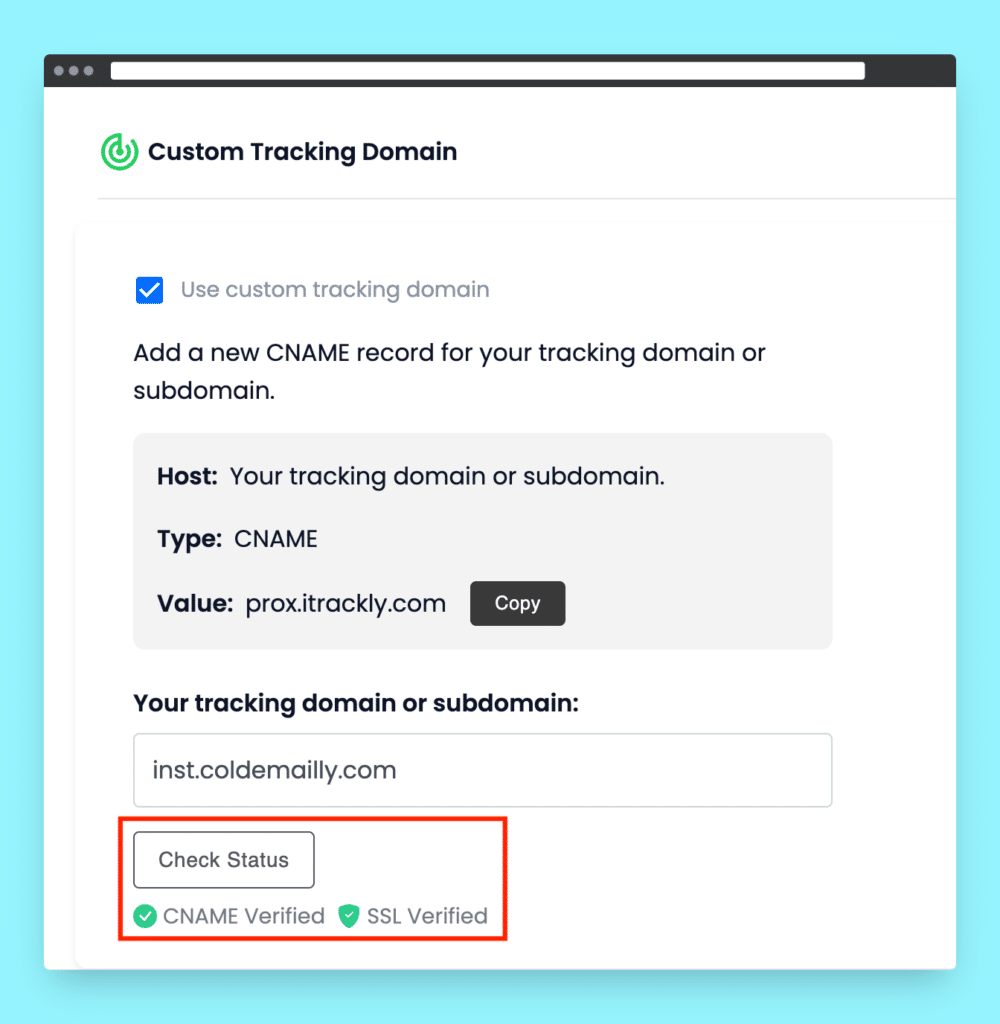
– Click on “Check Status.”
– If configured correctly, you will observe green check marks next to

“CNAME Verified” and “SSL Verified.”
By performing these checks, you ensure the accuracy of your technical setup, including SPF, DKIM, DMARC, and the functionality of your custom tracking domain. This step is crucial to guarantee a smooth and secure cold email outreach process.
To ensure your forwarding setup works correctly, visit the webpage of your secondary domain and check if it automatically redirects to your main business website.
CHAPTER V
Connecting Email Accounts to Instantly (10 mins)
Ensure all your email accounts are linked to Instantly by following these steps:
1. Connecting Google Workspace Email Accounts to Instantly:
– After linking your email accounts to Instantly, enable warm-up by clicking the flame icon.
– Let the system automatically warm up your email accounts for a minimum of 2 weeks before initiating any email sends.
Alternative Domains for Cold Emailing
To safeguard your main domain’s reputation, acquire alternative domains for cold emailing. Create a maximum of 2-3 email accounts per domain, and limit daily sends to 30-50 emails to avoid spam-related issues.
Purchase .com domains resembling your main domain, excluding special characters and numbers. If your business is named “arbhu.com,” consider domains like:
– getarbhu.com
– tryarbhu.com
– goarbhu.com
Creating Email Accounts
If using Google Workspace:
1. Visit [Google Workspace](https://workspace.google.com/) and click “Get Started.”
2. Follow on-screen instructions to set up your Google Workspace account.
3. Add all your domains to the Google Workspace account.
4. Create 2-3 email accounts per domain through the Google Workspace admin.
For detailed user addition instructions, refer to [Google’s guide](https://support.google.com/a/answer/33310?hl=en).
DNS Records Setup
If using your own domain, configure the following DNS records:
MX Records: Direct email delivery on the internet.
SPF Record: Specifies domains allowed to send emails on your behalf.
DKIM Record: Adds a signature to emails, verifying their origin.
DMARC Record: Communicates your desire for email authentication.
These records collectively ensure your email account functions well. Providers like Google may scrutinize accounts lacking these records.
Impact on Deliverability
These records significantly impact your account’s performance and deliverability. Lack of an MX record prevents receiving replies. SPF, DKIM, and DMARC records are crucial for authenticating emails and preventing performance issues.
Check your deliverability score and setup correctness in the sequence editor by clicking ‘preview email’ and then ‘check deliverability score.’
Ensure a seamless email outreach process with these steps.


Using GoDaddy as a domain name provider? Here are some specific guides:
Using Namecheap as a domain name provider? Here are some specific guides:
In general or if you’re using any other domain name providers you can use the resources below to set it up.
1) Set up MX records
Setting up the MX record is critical – you should refer to your email provider’s official guide for the latest information.
2) Set up SPF
You can check if your SPF is set up properly using this tool, or your Instantly dashboard.
3) Set up DKIM
Again, assuming you are using Google Workspace you can follow this guide to set up DKIM.
- Google/GSuite DKIM guide: link
- Office 365 DKIM guide: link
PS: Make sure to use your service provider recommended DKIM Selector:
Google/Gsuite – “google”
Office 365 – “microsoft”
Other service providers – “default”
You can check if your DKIM is set up properly using this tool, or your Instantly dashboard.
4) Set up DMARC
Important: Configure DKIM and SPF before configuring DMARC. DKIM and SPF should be authenticating messages for at least 48 hours before turning on DMARC.
Assuming you are using Google Workspace you can follow this guide to set up DMARC.
You may also choose to use a third-party DMARC provider like that from Postmark [link].
You can check if your DMARC is set up properly using this tool, or your Instantly dashboard.
Optional: Set up Forwarding
Also, you want to forward the new domains to your main domain. This can be done in the settings of your domain provider. If you are using GoDaddy, you can follow this guide.
CHAPTER VI
Domain Forwarding
You want to make sure that all of your sending domains are forwarded to your main domain. This is the easiest part of the technical setup process, you are almost done!
The main reason for setting up forwarding is that when people manually check where your email came from, they will be forwarded to your main business domain where they can find out more about you and see that you are legitimate. The other reason is that a permanent (301) forwarding links your secondary domains to your main domain.
Forwarding, just like previous steps, is also set up in your domain provider’s settings. Here’s how you do it with GoDaddy and NameCheap.
Custom Tracking Domain
Now you need to set up your own custom tracking domain, which is your personal domain (or sub-domain) used to track opens and clicks in your emails. This is super important in order to protect your email deliverability.
If you do not set up your own custom tracking domain, a public tracking domain will be used which is much like sharing a toothbrush with everyone else sending out emails. This is obviously not good for the health of your domains and deliverability.
Just like SPF, DKIM and DMARC, your custom tracking domain can be set up with a simple DNS record entry in your domain provider’s settings.
Here’s how to set it up:
- Go into your domain settings at your domain provider.
- Add a new CNAME type record.
- Set the value as prox.itrackly.com
- Set the name as inst
- Insert your custom tracking domain in Instantly, it will be formatted as inst.yourdomain.com
Here are guides on how to do it with the most popular domain providers:
1. Setting up custom tracking domain with GoDaddy
2. Setting up custom tracking domain with NameCheap
Setting Up Your Domain: A Step-by-Step Guide
If you’ve chosen GoDaddy or Namecheap as your domain provider, follow these specific guides for SPF, DMARC, and DKIM setup for Google Workspace and Microsoft/Office 365 accounts. For other providers, utilize the resources mentioned.
1. MX Records Setup (MX)
– Refer to your email provider’s official guide for the latest information.
– Google Workspace: [link](google-link)
– Office 365: [link](office365-link)
2. Sender Policy Framework (SPF) Setup
– Google/GSuite: [link](google-spf)
– Office 365: [link](office365-spf)
– Verify SPF setup using this [tool](spf-tool) or your Instantly dashboard.
3. Domain Keys Identified Mail (DKIM) Setup
– Google/GSuite: [link](google-dkim)
– Office 365: [link](office365-dkim)
– Confirm DKIM setup using this [tool](dkim-tool) or your Instantly dashboard.
– Use recommended DKIM Selectors: Google/Gsuite – “google,” Office 365 – “microsoft,” Other providers – “default.”
4. Domain-based Message Authentication, Reporting & Conformance (DMARC) Setup
– Configure DMARC after SPF and DKIM, ensuring authentication for at least 48 hours.
– Google Workspace: [link](google-dmarc)
– Utilize third-party DMARC providers like Postmark [link].
– Validate DMARC setup using this [tool](dmarc-tool) or your Instantly dashboard.
5. Optional: Domain Forwarding
– Forward your new domains to the main domain for legitimacy and cohesive branding.
– For GoDaddy, follow this [guide](godaddy-forwarding).
6. Custom Tracking Domain Setup
– Set up a custom tracking domain for improved email deliverability.
– Access your domain settings, add a new CNAME record:
– Value: prox.itrackly.com
– Name: inst
– Insert your custom tracking domain in Instantly as inst.yourdomain.com.
– Follow guides for [GoDaddy](godaddy-tracking) and [NameCheap](namecheap-tracking).
CHAPTER VII
Verification of Technical Setup
After connecting your accounts to Instantly:
– Test SPF, DKIM, and DMARC setup by clicking “Test Domain Setup.”
– Ensure custom tracking domain functionality by checking status in each sending account’s settings.
Follow these steps diligently to guarantee a flawless technical setup for your domains and email accounts.

Upon successful completion of the setup process, a confirmation message will appear, indicating that all configurations are correct.
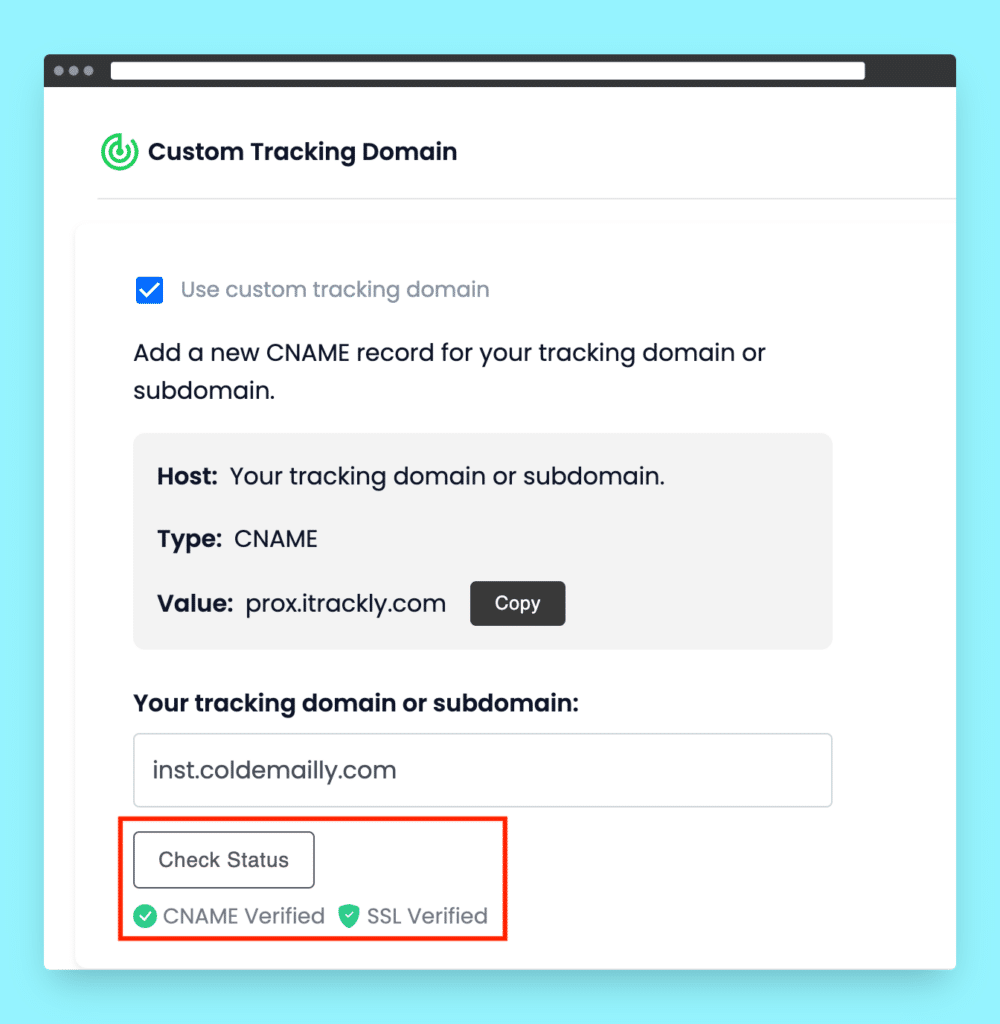
To verify the functionality of your custom tracking domain, navigate to the settings of each sending account and click on “Check status.” If everything is in order, you will notice green check marks next to “CNAME verified” and “SSL verified,” assuring the proper validation of your custom tracking domain. This straightforward process ensures that your tracking domain is seamlessly integrated and ready for optimal email deliverability.
, you can easily activate the warm-up process for each email account in your Email Accounts section.
2. Start by connecting your Google Workspace email accounts to Instantly using the following step-by-step guide:
– If you’ve set up a Google Workspace account, navigate to https://workspace.google.com/ and click on “Get Started.”
– Follow the on-screen instructions to complete the setup of your Google Workspace account.
– Add all of your domains to the Google Workspace account.
– Safely create 2-3 email accounts (users) per domain by adding users in your Google Workspace admin.
Refer to Google’s comprehensive step-by-step guide on how to add users to Google Workspace: [Google Workspace User Addition Guide](https://support.google.com/a/answer/33310?hl=en)
3. For effective email management and deliverability, it’s crucial to set up DNS records if you’re using your own domain for email purposes. Before delving into the setup process, understanding the functions of MX, SPF, DKIM, and DMARC records is essential:
MX records: These records guide the internet on where to deliver your emails, ensuring you receive them.
SPF record: Specifies which domains are permitted to send emails on your behalf.
DKIM record: Adds a signature to your emails, verifying their origin and preventing spoofing.
DMARC record: Authenticates your emails, indicating they are from a legitimate source.
Ensure all four records are correctly configured for optimal email account functionality.
4. Assess the impact of your email account’s performance and deliverability:
MX Records Setup:
– Follow your email provider’s official guide for the latest information.
– Google Workspace: [MX Records Setup](https://support.google.com/a/answer/140034?hl=en)
– Office 365: [MX Records Setup](https://learn.microsoft.com/en-us/exchange/mail-flow-best-practices/how-to-set-up-a-multifunction-device-or-application-to-send-email-using-microsoft-365?view=exchserver-2019)
SPF Setup:
– Google/GSuite SPF Guide: [SPF Setup](https://support.google.com/a/answer/33786?hl=en)
– Office 365 SPF Guide: [SPF Setup](https://docs.microsoft.com/en-us/microsoft-365/security/office-365-security/set-up-spf-in-office-365?view=o365-worldwide)
DKIM Setup:
– Google/GSuite DKIM Guide: [DKIM Setup](https://support.google.com/a/answer/174126?hl=en)
– Office 365 DKIM Guide: [DKIM Setup](https://learn.microsoft.com/en-us/exchange/antispam-and-antimalware/deploy-a-dkim-signing-policy?view=exchserver-2019)
DMARC Setup:
– Set up DKIM and SPF before configuring DMARC. Allow 48 hours for authentication before enabling DMARC.
– Google Workspace DMARC Guide: [DMARC Setup](https://support.google.com/a/answer/2466580?hl=en)
– Utilize third-party DMARC providers like Postmark if preferred.
Optional: Set up Forwarding:
– Forward new domains to your main domain through your domain provider’s settings.
– For GoDaddy, follow this guide: [GoDaddy Domain Forwarding](https://www.godaddy.com/help/manage-forwarding-automatically-forward-email-7598)
Domain Forwarding:
– Ensure all sending domains are forwarded to your main domain for easy verification and legitimacy.
– Follow domain provider settings for GoDaddy and NameCheap.
Custom Tracking Domain:
– Set up your custom tracking domain using a simple DNS record entry in your domain provider’s settings.
– Refer to guides for GoDaddy and NameCheap for a seamless setup.
5. After connecting your sending accounts to Instantly, verify the correct setup of SPF, DKIM, and DMARC by using the “Test Domain Setup” button. A confirmation message will appear if all configurations are accurate.
6. To ensure the effectiveness of your custom tracking domain, click “Check status” in each sending account’s settings. Green check marks next to “CNAME verified” and “SSL verified” indicate successful validation.
By following these steps diligently, you can guarantee a robust technical setup for your email accounts, optimizing deliverability and maintaining a positive sender reputation.

Warmup not yet enabled
When you click it, it will turn green which means that it is enabled.

The flame icon is green. Warmup is enabled.
2. Through Account Settings

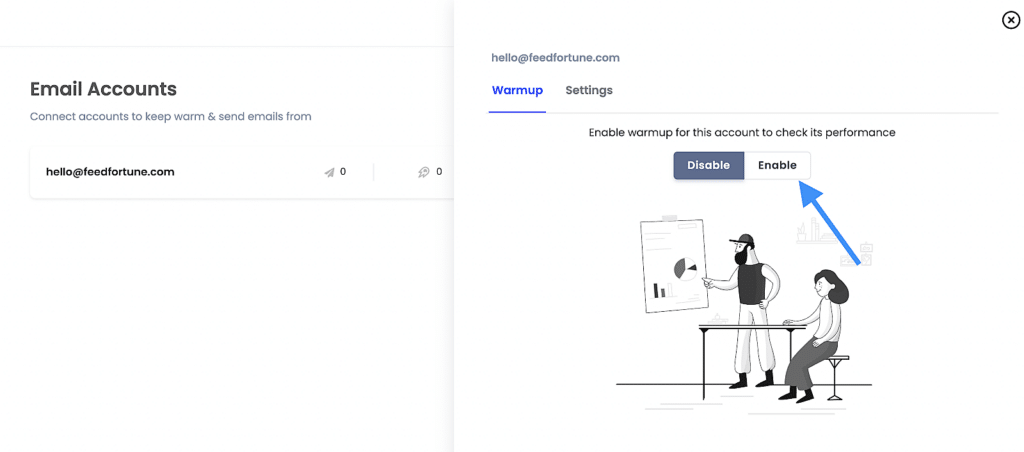
How to change the warmup settings

You can change the warmup settings of each email account by clicking on the ‘Settings’ icon.
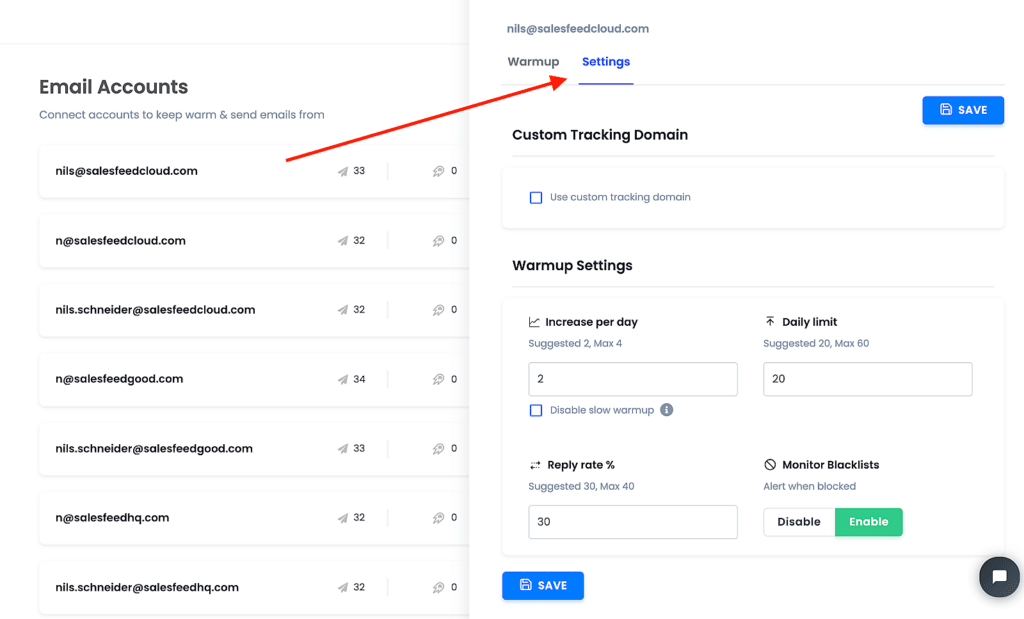
The warm-up settings are conveniently pre-filled with the recommended values. However, if you wish to make adjustments, simply click on the respective field and modify the values for “Increase per day,” “Daily limit,” and the “Reply rate %.” Once you’ve made your changes, ensure to click the blue ‘Save’ button.
Beneath the ‘Increase per day’ field, you’ll find the option to “Disable slow warmup.” We strongly advise using this option only for well-established email accounts that have already undergone the warming-up process. For new accounts, it’s essential to proceed with a gradual warm-up, a task Instantly automatically manages when you enable the Warmup feature.
Remember, slow and steady warm-up is crucial for newer accounts to build a positive sender reputation and establish trust with email service providers. Always exercise caution when considering the “Disable slow warmup” option, reserving it exclusively for accounts that have successfully completed the initial warming-up phase.

